WindowsReinstall.com - Fdisk

FDISK


About Fdisk

Setting drive to FAT 16 or FAT 32

Setting up Drives  

Deleting Drives

FDISK For drives larger than 64 gig but smaller than 137gb


Return to Main Page


The FDISK program is used for the setting up and deletion of partitions on a hard drive.

In DOS to get the program running you just type “FDISK” at any prompt.


After typing “FDISK” the first thing you will see is the following screen: (please note earlier versions of FDISK only allow you to use FAT 16, and when you run FDISK it goes straight to the main menu defaulting to this.)


Selecting “Y” and enter, enables FAT 32 (for partitions greater than 2GB) on the Hard drives, if you hit “N” and enter you will be stuck on FAT 16 (Max of 2 GB per partition).


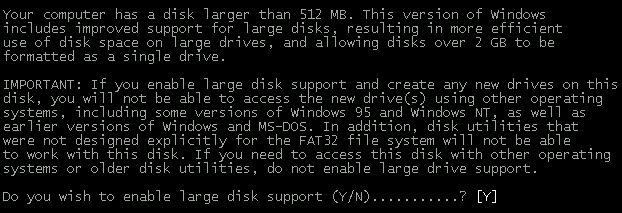
Once you have selected the type FAT you want to use, you will now have to setup the partition/s on the 
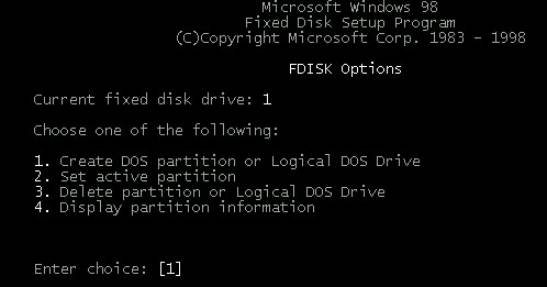
drive. The main menu will be as follows: (Note: if there is two hard drives then option 5 will also be displayed, this allows you to change the drive you are worked with. Fixed drive 1 is the main drive; fixed disk 2 is the secondary drive)


To create a drive all you have to do is select option one. This will take you to the following menu:


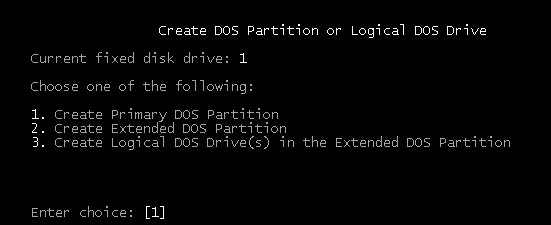
Option 1 - This allows you to setup a primary partition of size specified by user. This will be Drive “C

Option 2 – This allows you to setup an extended DOS partition which will be the remaining space left over after creating primary partition.

Option 3 - and finally this allows you to setup the Logical DOS Partitions, which will make up the space within the extended DOS Partition. These will be drives “D”, “E”, “F”, etc etc

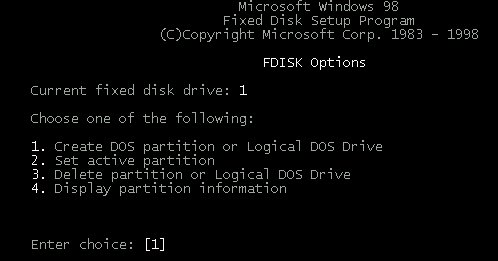
Now the drives have been setup you will have to make the drive Active, so escape from the DOS Partition menu and select option 2 from the main menu.

Once you have setup the drives and set the main drive active, reboot the computer and format the drive/s. See section on format.


If you are in Fdisk to remove the partitions then you will have to select option 3 from the main menu page. (Note: if there is two hard drives then option 5 will also be displayed, this allows you to change the drive you are worked with. Fixed drive 1 is the main drive; fixed disk 2 is the secondary drive)


And then from the next menu you will see the following:


For non-DOS partitions you will use option 4, for example NTFS used for Windows NT

To remove the partitions you will do the reverse of setting them up, follow the following steps


1 If present use option 3 and remove any Logical drives (Drives D, E, F, etc.)

2 If present remove the extended DOS partition. (Logical drives are contained within here)

3 Finally remove the Primary Drive (Drive C)

You can now go about setting up the hard drive again the way you want it. (See FDISK – SETTING UP DRIVES)


Microsoft Windows 98 Second Edition - Microsoft Windows 98 Standard Edition - Microsoft Windows 95 Service Pack 1

Click here to download